

What is a Component
Components are the most basic building blocks of an Angular application. A Real-world angular application will have tens to a few hundreds of components. Some of them are reusable and some of them or not. But what actually is a component?
We can define a component as a small block or part of a page that has its own template, style, selector and properties. An Angular app should have at least one component.
Take this site as an example. The homepage of this site has a navigation bar, sidebar, and an area to display the most recent posts. We can call these three sections as three different components.
Every Angular app is a tree of components. Starting with the app component as the base.
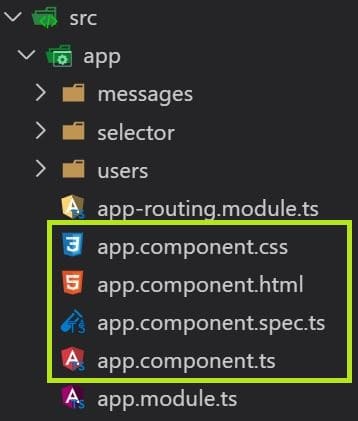
A component usually has four files.
- <name>.component.ts – This is where we write the logic.
- <name>.component.html – Holds HTML markup of the component.
- <name>.component.css – Defines styles (CSS) for the component.
- <name>.component.spec.ts – The .spec.ts files are for unit tests for individual components.
The app component
As we have seen earlier, App component is the root of an Angular application. You might have noticed that the home page has some content in it. Where did it come from? Let’s find out.
Open the app.component.html file. This is the HTML markup of our app component. Replace its contents with this code.
<h1>Welcome to my first Angular app</h1>Now come back to the browser. You will notice that the default content of our home page is replaced with our welcome message. So, what we saw in the home page was from app.component.html.
Let’s add some style
Now, let us add some style to our app component. To style the app component, open app.component.css and replace its content with this.
h1{
    color: dodgerblue;
    text-align: center;
}
Open your browser to see the output.
Exploring app.component.ts
Let’s have a look at the code of app.component.ts.
import { Component } from '@angular/core';

@Component({
    selector: 'app-root',
    templateUrl: './app.component.html',
    styleUrls: ['./app.component.css']
})
export class AppComponent {
    title = 'LearnAngular';
}
From this code, it is clear that every component is a class. Here the name of our class is AppComponent. But what are these @Component, selector, templateUrl, and styleUrls?
@Component
All components including AppComponent is basically a typescript class. To mark this class as a component, we should add some metadata to it using @Component decorator. This metadata helps Angular to decide how the component should be processed.
Properties / metadata
selector – This is a unique string that Angular uses to decide where the component should be displayed. Whenever angular finds an HTML tag with the name of a selector, it displays the corresponding component is displayed within the tags.
To see this in action, open index.html in src folder. You will see these lines in the markup.
<body>
  <app-root></app-root>
</body>
We saw that app-root was the selector of appComponent. So, Angular will automatically place the content of appComponent within these tags.
Here’s the final output from the browser’s console.
<body data-gr-c-s-loaded="true">
    <app-root _nghost-ddu-c0="" ng-version="8.2.14">
        <div _ngcontent-ddu-c0="" class="toolbar" role="banner">
            <!-- Code removed for brevity -->
        </div>
        <router-outlet _ngcontent-ddu-c0=""></router-outlet>
    </app-root>
    <!-- Code removed for brevity -->
</body>- templateUrl – This is the reference to the HTML Markup of our component.
- styleUrls – A list that contains references to the style sheets of our component.
Create a new component
Fortunately, Angular CLI allows us to create new components with a single-line command. Open a new terminal in the project folder and run ng g c <component_name>. This will create a new component and register it in app.module.ts.
💡We should register every component in the app_name.module.tsfile before using it.
ng g c employeesYou will get an output similar to this.
PS C:\Users\Username\Desktop\Angular\LearnAngular> ng g c employees
CREATE src/app/employees/employees.component.html (24 bytes)
CREATE src/app/employees/employees.component.spec.ts (649 bytes)
CREATE src/app/employees/employees.component.ts (281 bytes)
CREATE src/app/employees/employees.component.css (0 bytes)
UPDATE src/app/app.module.ts (487 bytes)
The last line tells that our new component is registered in app.module.ts.
Registering components manually
To register a component in app’s module.ts file, add reference to the component and specify it in the declerations list.
import { EmployeesComponent } from './employees/employees.component';

@NgModule({
  declarations: [
    AppComponent,
    EmployeesComponent
  ],
  imports: [
    // Code removed for brevity
  ],
  // Code removed for bevity
})
Replace EmployeeComponent with the name of your component.
Displaying the component
To display the component, replace the content of app.component.htmlwith this markup.
<app-employees></app-employees>Save the file and open the browser and verify the output.
In the next post, we’ll learn how to display a list of employees in the component.


