

The aim of this article is to provide an overview of bind data to Grid View with some basic functionalities like edit, update and delete and pagination.
This tutorial is divided into two parts.
- Part 1 – Automatically binding data.
- Part 2- Manually binding data (Using a custom query).
Part 1- Binding data automatically
You can either add a GridView to your Web Form form the toolbox or by adding the following code in your aspx file.
<asp:GridView ID="myGridView" runat="server"> </asp:GridView>
Go to properties and Change the following properties as:
- AllowSorting – True
- AutoGenerateColumns – True
- AutoGenerateDeleteButton – True
- AutoGenerateEditButton – True
Select DataSourceId -> <New Data Source…> from the properties window as shown in the picture.

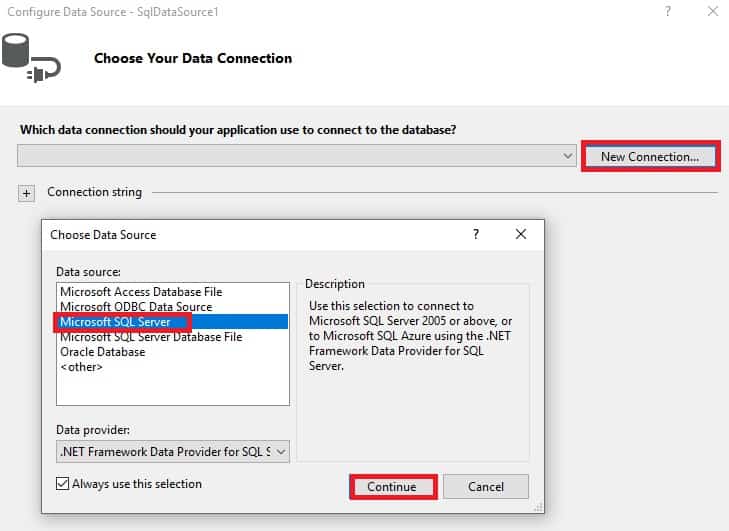
In the next window, select SQL Database and click OK.
In the Configure database window, click on New Connection -> And make selections as shown in the picture.
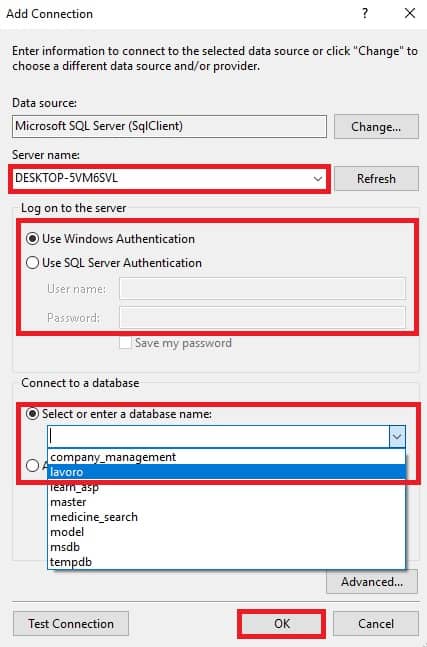
Click Continue and a window to add new connection will appear. Make selections as shown in the picture and select your database (lavoro for me) and click Ok.
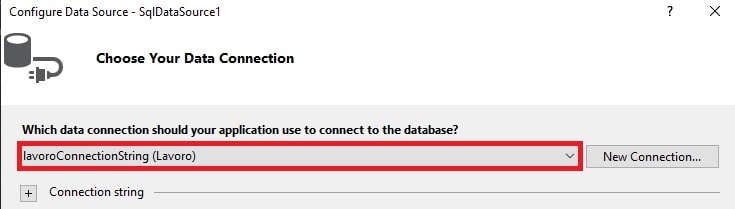
Select your newly created connection and click Next.
The next window will allow you to save the connection to your config file. Select Next..
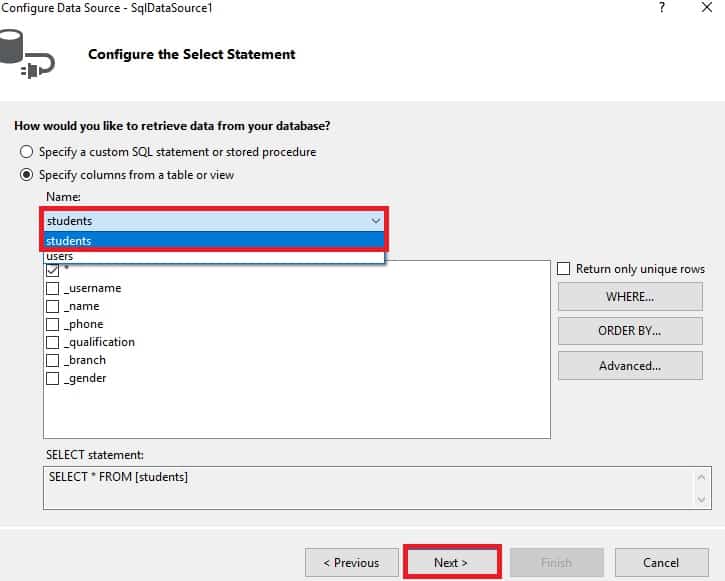
Select the table which you want to display in the grid view and click Next and click Finish in the next window.
Now, the code of your GridView will be similar to this.
<asp:GridView ID="GridView1" runat="server" AllowSorting="True" AutoGenerateColumns="False" AutoGenerateDeleteButton="True" AutoGenerateEditButton="True" DataKeyNames="_username" DataSourceID="SqlDataSource1">
     <Columns>
         <asp:BoundField DataField="_username" HeaderText="_username" ReadOnly="True" SortExpression="_username" />
         <asp:BoundField DataField="_name" HeaderText="_name" SortExpression="_name" />
         <asp:BoundField DataField="_phone" HeaderText="_phone" SortExpression="_phone" />
         <asp:BoundField DataField="_qualification" HeaderText="_qualification" SortExpression="_qualification" />
         <asp:BoundField DataField="_branch" HeaderText="_branch" SortExpression="_branch" />
         <asp:BoundField DataField="_gender" HeaderText="_gender" SortExpression="_gender" />
     </Columns>
 </asp:GridView>
 <asp:SqlDataSource ID="SqlDataSource1" runat="server" ConnectionString="<%$ ConnectionStrings:lavoroConnectionString2 %>" SelectCommand="SELECT * FROM [students]"></asp:SqlDataSource>
Run the code and you will see an output similar to this.

You can change the Column header text by changing the value of HeaderText property. Here’s an example.
<asp:GridView ID="GridView1" runat="server" AllowSorting="True" AutoGenerateColumns="False" AutoGenerateDeleteButton="True" AutoGenerateEditButton="True" CellPadding="4" DataKeyNames="_username" DataSourceID="SqlDataSource1" ForeColor="#333333" GridLines="None">
     <AlternatingRowStyle BackColor="White" />
     <Columns>
         <asp:BoundField DataField="_username" HeaderText="Username" ReadOnly="True" SortExpression="_username" />
         <asp:BoundField DataField="_name" HeaderText="Name" SortExpression="_name" />
         <asp:BoundField DataField="_phone" HeaderText="Phone" SortExpression="_phone" />
         <asp:BoundField DataField="_qualification" HeaderText="Qualification" SortExpression="_qualification" />
         <asp:BoundField DataField="_branch" HeaderText="Branch" SortExpression="_branch" />
         <asp:BoundField DataField="_gender" HeaderText="Gender" SortExpression="_gender" />
     </Columns>
 </asp:GridView>
Customizing the GridView
To further customize the table by changing the color of rows and colums,
- Go to design.
- Click on the > Symbol on the GridView.
- Select Enable paging if you wish to enable paging.
- Click Auto Format.
- Select a color scheme and click OK.

Or you can modify the code as:
<asp:GridView ID="GridView1" runat="server" AllowSorting="True" AutoGenerateColumns="False" AutoGenerateDeleteButton="True" AutoGenerateEditButton="True" CellPadding="4" DataKeyNames="_username" DataSourceID="SqlDataSource1" ForeColor="#333333" GridLines="None" AllowPaging="True">
     <AlternatingRowStyle BackColor="White" />
     <Columns>
         <asp:BoundField DataField="_username" HeaderText="Username" ReadOnly="True" SortExpression="_username" />
         <asp:BoundField DataField="_name" HeaderText="Name" SortExpression="_name" />
         <asp:BoundField DataField="_phone" HeaderText="Phone" SortExpression="_phone" />
         <asp:BoundField DataField="_qualification" HeaderText="Qualification" SortExpression="_qualification" />
         <asp:BoundField DataField="_branch" HeaderText="Branch" SortExpression="_branch" />
         <asp:BoundField DataField="_gender" HeaderText="Gender" SortExpression="_gender" />
     </Columns>
     <EditRowStyle BackColor="#2461BF" />
     <FooterStyle BackColor="#507CD1" Font-Bold="True" ForeColor="White" />
     <HeaderStyle BackColor="#507CD1" Font-Bold="True" ForeColor="White" />
     <PagerStyle BackColor="#2461BF" ForeColor="White" HorizontalAlign="Center" />
     <RowStyle BackColor="#EFF3FB" />
     <SelectedRowStyle BackColor="#D1DDF1" Font-Bold="True" ForeColor="#333333" />
     <SortedAscendingCellStyle BackColor="#F5F7FB" />
     <SortedAscendingHeaderStyle BackColor="#6D95E1" />
     <SortedDescendingCellStyle BackColor="#E9EBEF" />
     <SortedDescendingHeaderStyle BackColor="#4870BE" />
 </asp:GridView>
 <asp:SqlDataSource ID="SqlDataSource1" runat="server" ConnectionString="<%$ ConnectionStrings:lavoroConnectionString2 %>" SelectCommand="SELECT * FROM [students]"></asp:SqlDataSource>
Part 2 – Binding data manually
You can also bind data to GridView manually so that you will get more control over the data displayed in a GridView.
Before continuing, add reference to the following namespace:
using System.Data.SqlClient;Add GridView, Textbox and a Button:
Create a new WebForm and add the following code.
<form id="form1" runat="server">
     <asp:TextBox ID="txtsearch" runat="server"></asp:TextBox>
     <asp:Button ID="btnsearch" runat="server" Text="Search" OnClick="btnsearch_Click"/>
     <br />
     <asp:GridView ID="GridView1" runat="server"></asp:GridView>
 </form>
To manually bind data to GridView, add the following code to the Button click event.
protected void btnsearch_Click(object sender, EventArgs e)
 {
     string url = "Data Source=DESKTOP-5VM6SVL;Initial Catalog=lavoro;Integrated Security=true;";
     string name=txtsearch.Text;
     string sql = "select * from emp_details where _name like '%" + name + "%'";

     SqlConnection conn = new SqlConnection(url);
     SqlCommand cmd = new SqlCommand(sql, conn); conn.Open();
     SqlDataReader result = cmd.ExecuteReader();

     GridView1.DataSource = result;
     GridView1.DataBind();
 }
Here’s my emp_details table.
| _id | emp_name | _email | _phone | _emp_id |
| 1 | John Doe | johndoe@mail.com | 12345678 | SW7J18 |
| 2 | Jane Doe | janedoe@mail.com | 45648278 | SW86G2 |
| 3 | Peter Adams | peter@mail.com | 87665766 | DEV6782 |
To see how to customize the GridView with custom column headers and additional functionalities such as Edit, update, sort, delete, and paging, see page 1 of this post.


