

If you know HTML, CSS, and JavaScript, you can create beautiful themes for your Ghost blog. In this post, we will see how to create a Ghost theme from scratch.
This tutorial is divided into a few sections.
- Part 1 - Create a simple Ghost theme.
- Part 2 - Add navigation bar and custom templates.
- Part 3 - Add search to the theme.
- Part 4 - Integrating comments and partials.
Download source code
If you are facing any issues or errors, you can download the source code from GitHub and use it as a reference.
Prerequisites
Before continuing, please make sure you have installed NodeJs and any text editor or your choice. In this tutorial, I'll be using Visual Studio Code.
To develop a theme for ghost, one should have basic knowledge in:
- HTML
- CSS
- JavaScript
- Handlebars
Install Ghost
To develop and test the theme, you should install Ghost on your computer.
On Windows, open Command Prompt or PowerShell and type node --version and verify that you have installed a supported version of node.
- Now, install Ghost-CLI
npm install -g ghost-cli- Before installing Ghost, Navigate to Desktop and create a folder named ghost
mkdir -p Desktop/ghost- And install Ghost in the folder.
cd ghost
ghost install local
# Or run npm install ghost
This will Ghost on your local machine.
Handlebars
Ghost uses Handlebars template engine to bring dynamic content in theme. This helps to create a clear separation between the design (HTML, CSS) and JavaScript logic.
Ghost uses Handlebars template engine to manage dynamic content and JavaScript logic in the themes.
Install GScan
GScan is a tool to validate Ghost themes. All themes uploaded to Ghost will be automatically scanned with GScan to avoid fatal errors.
Install GScan by running:
# Install the npm package
npm install -g gscan

# Use gscan <file path> anywhere to run gscan against a folder
gscan /path/to/ghost/content/themes/casper

# Run gscan on a zip file
gscan -z /path/to/download/theme.zip
Theme structure
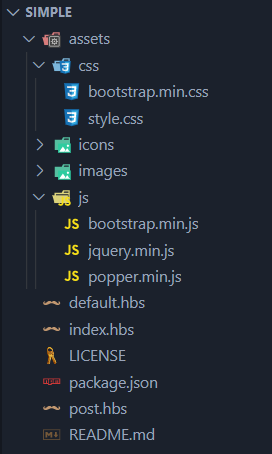
It is recommended to follow this structure while developing a Ghost theme.
.
├── /assets
    ├── /css
        ├── screen.css
    ├── /fonts
    ├── /images
    ├── /js
├── /partials [optional]
    ├── list-post.hbs
├── default.hbs
├── index.hbs [required]
└── post.hbs [required]
└── package.json [required]- assets - Place all the assets ( CSS, JS, Images, Fonts etc ) of your theme in this folder.
- partials - This is where you place different reusable parts of your template.
A Ghost theme should have index.hbs and post.hbs.
Theme templates
- default.hbs - This is the base template that contains the HTML markup (Outline) that exists on every page such as
<html>,<head>and<body>tags. For example, the navigation bar and footer will be same on all pages of the blog. So, we'll write the HTML markup of navigation bar and footer in default.hbs. - index.hbs - This is the most common template. It is used to display the list of posts. This template will be used if your theme does not have a
tag.hbs,author.hbsorindex.hbspage template. Usually, theindex.hbstemplate inherits the header and footer section fromdefault.hbs. Every Ghost themes should have this template. - home.hbs -
home.hbswill be used if you want a separate home page for your blog. In other words, we can say thathome.hbsact as the home page of a blog. It's an optional template. - post.hbs - The required template for a single post which extends
default.hbsand uses the{{#post}}helper to output the post details. Custom templates for individual posts can be created usingpost-:slug.hbs. - page.hbs - An optional template for static pages. If this is not specified then
post.hbswill be used. Custom templates for individual pages can be created usingpage-:slug.hbs. - author.hbs - An optional template for author archive pages. If not specified the
index.hbstemplate is used. Custom templates for individual authors can be created usingauthor{{slug}}. - private.hbs - An optional template for the password form page on password-protected publications.
- error.hbs - This theme template is used to display
404or500errors that are not handled by error- or class-specific templates. If one is not specified Ghost will use the default. - tag.hbs - An optional template for tag archive pages. If not specified the
index.hbstemplate is used. Custom templates for individual tags can be created usingtag-:slug. - amp.hbs - An optional theme template for AMP (Accelerated Mobile Pages). If your theme doesn't provide an
amp.hbsfile, Ghost will use its default. - robots.txt - Themes can include a robots.txt which overrides the default robots.txt provided by Ghost.
custom-{{template-name}}.hbs
An optional custom templates that can be selected in the admin interface on a per-post basis. They can be used for both posts and pages.
error-{{error-class}}xx.hbs
An optional theme template for errors belonging to a specific class (e.g. error-4xx.hbs for 400-level errors). A matching error class template is prioritized over both error.hbs and the Ghost default template for rendering the error.
error-{{error-code}}.hbs
An optional theme template for status code-specific errors (e.g. error-404.hbs). A matching error code template is prioritized over all other error templates for rendering the error.
Create a Ghost theme
To create a Ghost theme, we need to:
- Create a new folder for the theme under content/themes and create the theme layout.
- Create a
package.jsonfile and set the metadata of the theme. - Add three files named
default.hbs,index.hbsandpost.hbsand write some code to display the blog content. - Restart the Ghost installation.
- Login as Ghost admin and activate the custom theme.
Now, let's follow these steps and create our first Ghost theme.
Step 1: Create a theme layout
The first thing we should do to create a Ghost theme is to set up a basic theme layout. Setting a theme layout will help us to keep the files of our theme organized.
Here's a simple layout. You can download this layout from GitHub.
Setting up theme
Open the Ghost installation folder as a project in your favorite text editor. In this tutorial, I'll be using Visual Studio code.
Create a new directory named simple under content -> themes and extract the theme layout to it.
Let's take a look at package.json.
{
  "name": "simple",
  "description": "A custom Ghost theme",
  "version": "0.0.1",
  "engines": {
    "ghost": ">=3.0.0",
    "ghost-api": "v3"
  },
  "license": "gpl-3.0",
  "author": {
    "name": "Geekinsta",
    "email": "admin@geekinsta.com",
    "url": "https://www.geekinsta.com"
  },
  "gpm": {
    "type": "theme",
    "categories": [
      "Minimal",
      "Magazine",
      "Blog"
    ]
  },
  "keywords": [
    "ghost",
    "theme",
    "ghost-theme",
    "Geekinsta"
  ],
  "config": {
    "posts_per_page": 10,
    "image_sizes": {}
  }
}
As you can see, this file holds the basic information (what we call metadata of the theme) about the theme.
Installing theme
Next, we're going to set our custom theme as the new theme of our ghost blog. For that, navigate to https://localhost:2368/ghost and login as ghost admin. Under Settings -> Design, you will see the default Casper theme listed there. But our theme is not displayed. Well, this is because Ghost won't detect new themes until the next restart.
Restart Ghost with this command.
ghost restartReload the page and you will see our theme listed there.

Click Activate to activate the theme. Ghost may list a couple of errors and warnings. These errors can be fixed by adding these styles to style.css.
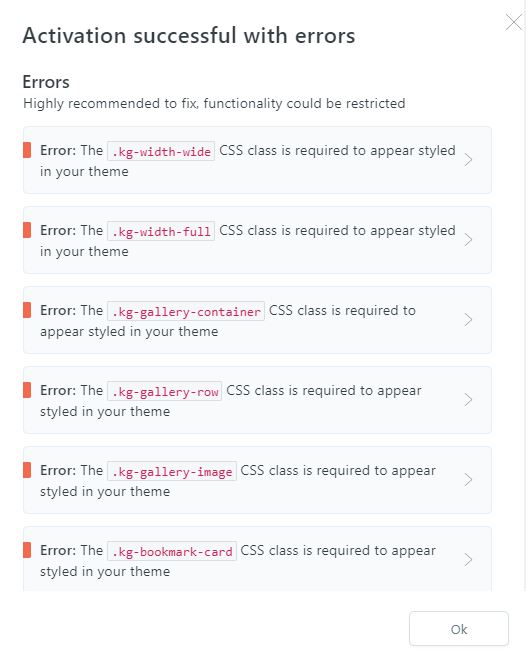
Click OK to activate the theme.
Let's code
You will get a blank page if you visit the blog now because we left our theme files blank. So, let's develop our theme now.
Helpers
We'll add some non-HTML tags like {{meta_title}}, {{ghost_head}}, {{{body}}}, {{ghost_foot}} with the HTML markup of our theme. They are known as helpers. As the name indicates, they help you with tasks.
For example, the {{meta_title}} helps you to display the title of the page. As the names of helpers are very self-explanatory, it is easy to understand the functionality of each helper. You can read about more helpers from the official documentation.
Base template
Open default.hbs and add the following content to it.
<!doctype html>
<html lang="{{@site.lang}}">
<head>
<title>{{meta_title}}</title>
<!-- Required meta tags -->
<meta charset="utf-8">
<meta name="viewport" content="width=device-width, initial-scale=1, shrink-to-fit=no">
<!-- Bootstrap CSS -->
<link rel="stylesheet" href="{{asset "css/bootstrap.min.css"}}">
{{!-- Custom Styles --}}
<link rel="stylesheet" href="{{asset "css/style.css"}}">
{{!-- Dynamic header content for SEO, meta tags, code injection etc --}}
{{ghost_head}}
</head>
<body class="{{body_class}}">
{{!-- Navigation bar --}}
<nav class="navbar navbar-expand-lg navbar-light bg-light fixed-top">
<a class="navbar-brand" href="#">{{@site.title}}</a>
<button class="navbar-toggler" type="button" data-toggle="collapse" data-target="#navbarTogglerDemo02"
aria-controls="navbarTogglerDemo02" aria-expanded="false" aria-label="Toggle navigation">
<span class="navbar-toggler-icon"></span>
</button>
<div class="collapse navbar-collapse" id="navbarTogglerDemo02">
<ul class="navbar-nav mr-auto mt-2 mt-lg-0">
<li class="nav-item active">
<a class="nav-link" href="/">Home</a>
</li>
</ul>
</div>
</nav>
{{!-- End Navbar --}}
{{!-- All the main content gets inserted here, index.hbs, post.hbs, etc --}}
{{{body}}}
{{!-- Footer content goes here --}}
<div class="card">
<div class="card-footer text-muted">
© {{date format="YYYY"}} {{@site.title}}
</div>
</div>
{{!-- End of footer --}}
{{!-- Dynamic footer content from code injection etc --}}
{{ghost_foot}}
<!-- Optional JavaScript -->
<!-- jQuery Slim first, then Popper.js, then Bootstrap JS -->
<script src="{{asset "js/jquery.min.js"}}"></script>
<script src="{{asset "js/popper.min.js"}}"></script>
<script src="{{asset "js/bootstrap.min.js"}}"></script>
</body>
</html>As we've discussed earlier, this file serves as the parent or root file. It holds the basic HTML tags such as <head>, <title> etc that are common on all pages.
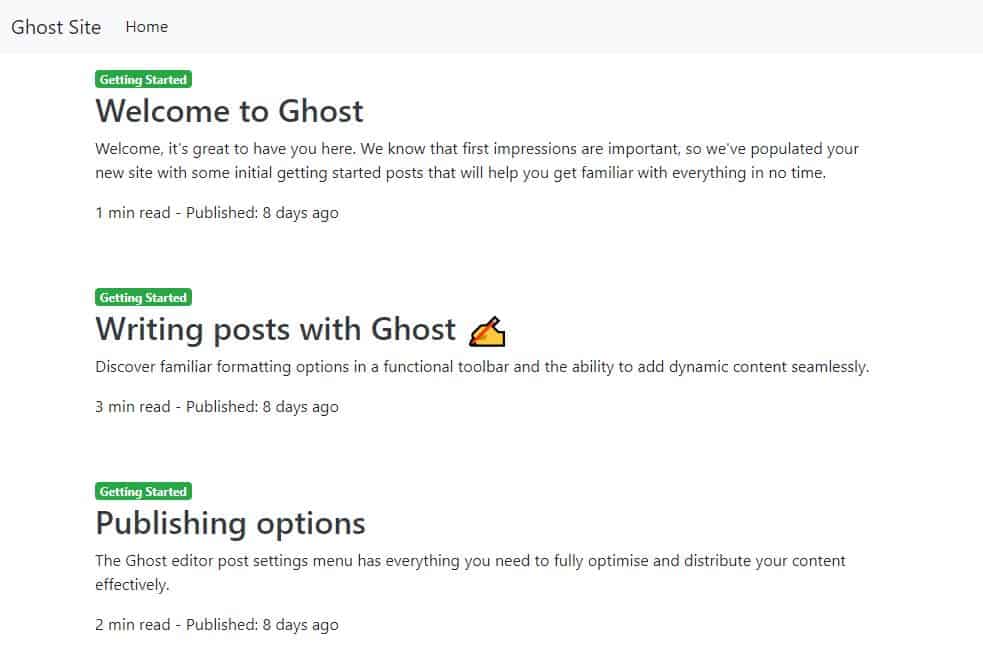
Listing Posts
Next, open index.hbs and add the following code. This page will serve as the template to list your posts.
{{!< default}}
{{!-- The tag above means: insert everything in this file
into the {body} of the default.hbs template --}}

{{!-- The main content area --}}
<main id="site-main">
    <div class="container">

        <div class="p-5">
            {{!-- Iterate through each posts --}}
            {{#foreach posts}}

            <article class="{{post_class}}" style="margin-bottom: 20px;">
                <div class="card-body">

                    {{!-- Display primary tag of the post if exists--}}
                    {{#if primary_tag}}
                    <a href="{{primary_tag.url}}" class="badge badge-success">
                        {{primary_tag.name}}
                    </a>
                    {{/if}}

                    <a class="text-dark" href="{{url}}">
                        {{!-- Post title --}}
                        <h2>{{title}}</h2>
                    </a>

                    {{!-- Displays post excerpt. Sets to display max 170 chars if not set --}}
                    <p>{{excerpt characters="170"}}</p>

                    <div>
                        <span class="reading-time">{{reading_time}}</span>
                        <span> - Published: {{date published_at timeago="true"}}</span>
                    </div>

                </div>{{!--/.post-card-content--}}
            </article>

            {{/foreach}}
        </div>

    </div>
</main>
After adding the content, reload the home page of the blog. You will get a page similar to the one shown below.
Displaying single post
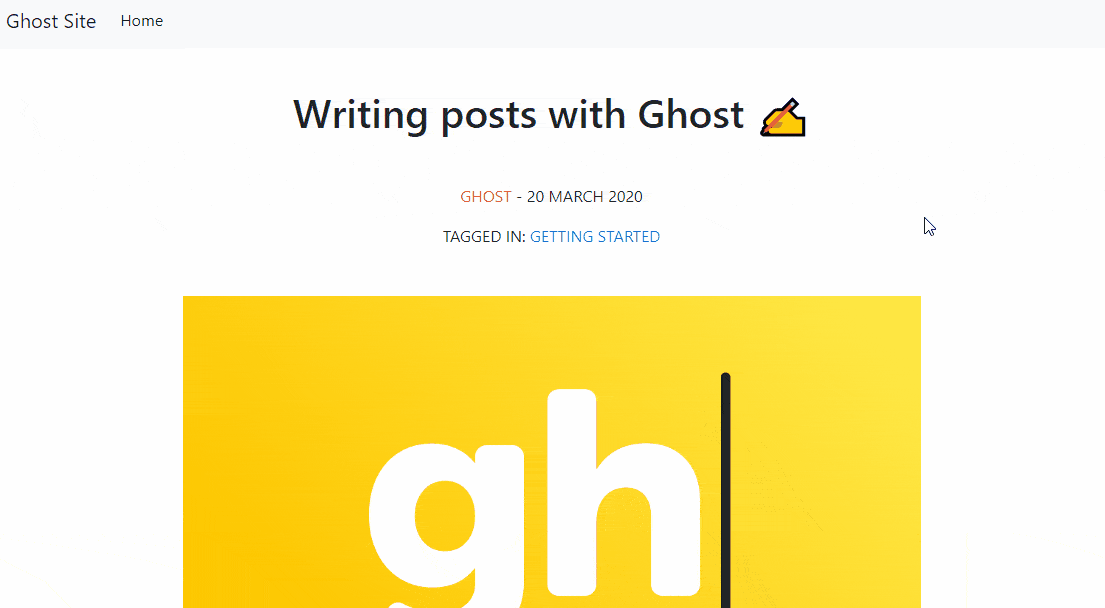
Next, we should create a template to display individual posts. For that, add the following code to post.hbs.
{{!< default}}
{{!-- The tag above means: insert everything in this file
into the {body} of the default.hbs template --}}
{{!-- Everything inside the #post tags pulls data from the post --}}
{{#post}}
<main id="site-main" class="container">
<div class="p-5 m-5">
<article class="{{post_class}} {{#unless feature_image}}no-image{{/unless}}">
<h1 class="text-center">{{title}}</h1>
{{!-- Display author, date and tags --}}
<div class="text-center text-upper m-5">
<a class="text-danger" href="{{primary_author.url}}">
{{primary_author.name}}
</a>
<time datetime="{{date format="YYYY-MM-DD"}}">
- {{date format="D MMMM YYYY"}}
</time>
{{!-- Displays upto three tags separated by comma --}}
<p class="m-3">
{{tags prefix="Tagged in: " separator=", " limit="3"}}
</p>
</div>
{{!-- Displays the featured image if exists --}}
{{#if feature_image}}
<figure>
<img src="{{img_url feature_image}}" alt="{{title}}" class="img-fluid" />
</figure>
{{/if}}
<section class="mt-5">
<div class="post-content">
{{!-- Display the post content --}}
{{content}}
</div>
</section>
</article>
</div>
</main>
{{/post}}Click on any post to see this template in action. Here's my output.
What's next?
In this post, we've learned to create a simple bootstrap theme for a Ghost blog. The next section of this post outlines how to add a navigation bar and pagination to the theme.


