

In this article, we will create a simple ASP .NET Core MVC Web application with MySQL as the database instead of SQL Server.
MySQL is one of the most widely used databases and it even has an open-source fork called MariaDB. Fortunately, with different database providers for Entity Framework Core, we can easily configure EF to work with databases including MySQL and MariaDB.
Prerequisites
- MySQL - In this tutorial, I'll be using XAMPP.
- Visual Studio 2022 with Web development templates installed.
- .NET Core 6 or .NET Core 5.
Create A New Project
Open Visual Studio -> Create New Project -> Select > Web Application (Model View Controller).

Select .NET 5 or 6 as the target framework.
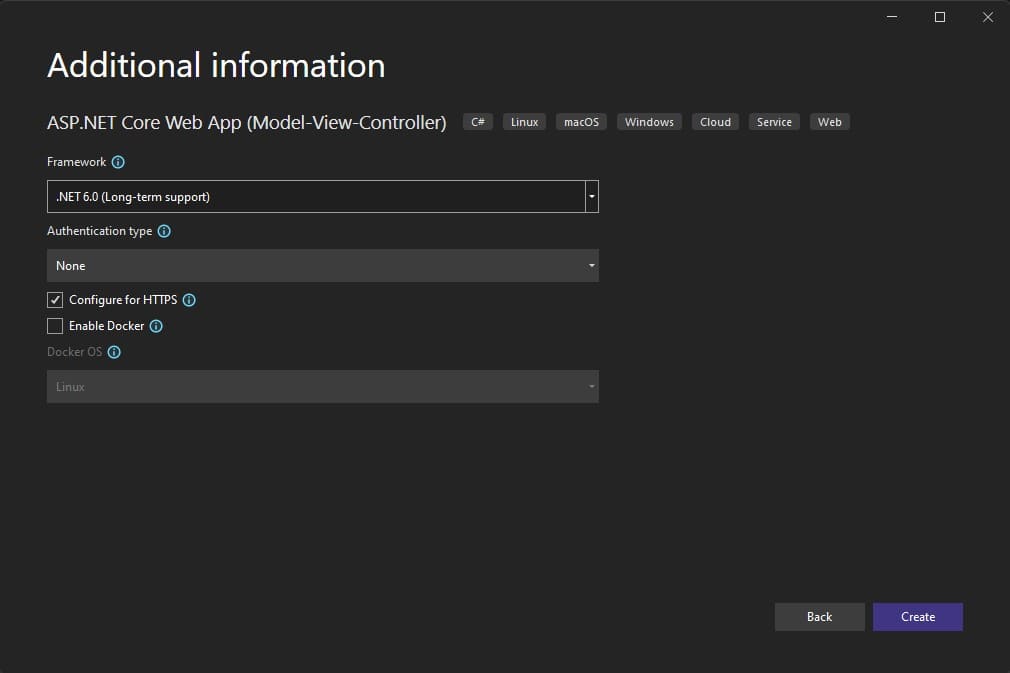
As we won't be dealing with authentication and authorization in this project, the Authentication type should be set as No Authentication.
Install Required Packages
Next, we are going to install some packages, including Entity Framework Core, to connect with MySQL.
Open the NuGet Package Manager console and run the following commands to install the required packages.
Entity Framework Core:
Install-Package Microsoft.EntityFrameworkCore -Version 6.0.0
Entity Framework Core Tools:
Install-Package Microsoft.EntityFrameworkCore.Tools -Version 6.0.0
Pomelo MySQL provider for Entity Framework:
Install-Package Pomelo.EntityFrameworkCore.MySql -Version 6.0.0
Pomelo.EntityFrameworkCore.MySql is the most popular Entity Framework Core provider for MySQL-compatible databases.
Required Imports
Next, we have to create a model class, create a migration and create the table in the database. Before creating the model, I'll create a new C# class and a few namespaces as global imports.
global using System.ComponentModel.DataAnnotations;
global using System.ComponentModel.DataAnnotations.Schema;
global using Microsoft.EntityFrameworkCore;
global using DotNetCoreMySQL.Models;
global using DotNetCoreMySQL.Data;Create a Model Class
Create a new class called Employee.cs in the Models folder and add the following code to it.
namespace DotNetCoreMySQL.Models
{
    [Index(nameof(Email), IsUnique = true)]
    public class Employee
    {
        public int Id { get; set; }

        [Required(ErrorMessage = "Name field is required.")]
        [StringLength(maximumLength: 100, MinimumLength = 2)]
        public string Name { get; set; }

        [Required(ErrorMessage = "Email field is required.")]
        [StringLength(maximumLength: 100, MinimumLength = 2)]
        [EmailAddress]
        public string Email { get; set; }

        [Required(ErrorMessage = "Phone field is required.")]
        [StringLength(maximumLength: 15, MinimumLength = 10)]
        public string Phone { get; set; }

        [StringLength(maximumLength: 250)]
        public string? Address { get; set; }
    }
}
This is a simple model to hold employee details like name, email, phone, and address. The email field is unique.
Create DBContext
Next, we should create a database context class and our employee model to the context.
Create a new folder named Data and add a new class called ApplicationDbContext with the following code.
namespace DotNetCoreMySQL.Data
{
    public class ApplicationDbContext:DbContext
    {
        public ApplicationDbContext(DbContextOptions<ApplicationDbContext> options):
            base(options)
        {

        }

        public DbSet<Employee> Employees { get; set; }
    }
}
Add a Connection String
Open the appsettings.json file and add a new connection string with the credentials needed to connect with your MySQL database as shown below.
{
  "Logging": {
    "LogLevel": {
      "Default": "Information",
      "Microsoft.AspNetCore": "Warning"
    }
  },
  "AllowedHosts": "*",
  "ConnectionStrings": {
    "DefaultConnection": "Server=localhost;Database=DotNetCoreMySql;User=root;Password=;"
  }
}
You should make appropriate changes to the connection string.
Configure App To Use MySQL
The last and final step is to configure our application and Entity Framework Core to use the MySQL database.
If you are new to .NET 6, you will see significant changes in the application startup file. But you can use the same code in older versions of.net Core without any issues.
If you are using .NET 6, add this code to Program.cs.
var connectionString = builder.Configuration.GetConnectionString("DefaultConnection");
builder.Services.AddDbContext<ApplicationDbContext>(options =>
{
    options.UseMySql(connectionString, ServerVersion.AutoDetect(connectionString));
});
In older versions of .NET Core, this code should be added to the configure services method of the startup class.
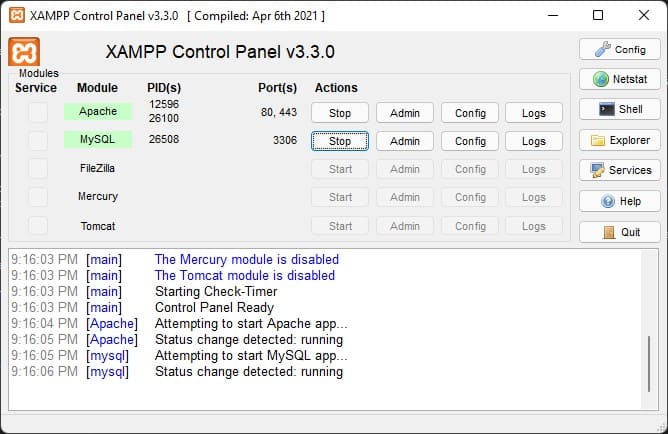
MySQL And XAMPP
If you haven't installed my SQL on your computer, you can either download and install MySQL from its official website or you can install it with XAMPP.
After installing XAMPP, open the control panel and start MySQL.
Conclusion
I hope you have enjoyed this post. If you have any questions let me know in the comments below.


