

This is the fifth post in my Flutter tutorial. So far, we have learned how to create a basic Flutter application and apply Material Design to it. In this post, I’m going to introduce some good programming practices that you can follow while developing a Flutter application. Also, We’ll learn how to organize the code in Flutter.
Organizing the code – Part 1
You might have noticed that our main method grows bigger as new widgets are added to it. This might not be a problem for simple applications. But for larger applications, we should organize the code to improve the readability of the code. Let’s see how we can do it in Flutter.
For beginners to easily understand, let’s organize the code step-by-step. First, we’re splitting the main method by writing the design logic in a separate class.
class MyDesign extends StatelessWidget{

}
This will show an error. That is because of a missing override. To fix this, click on the name of the class and press Left Alt+Enter. From the option that appears, select Create one missing Override (s). Now your code will look similar to this:
class MyDesign extends StatelessWidget{
  @override
  Widget build(BuildContext context) {
    // TODO: implement build
    return null;
  }
}
You might have noticed that MyDesign class extends from StatelessWidget class. This indicates that widgets returned from this class will be stateless, ie, they will never change their properties in future.
Now, lets move our design logic to MyDesign class.
class MyDesign extends StatelessWidget{
	@override
    Widget build(BuildContext context) {
    	// TODO: implement build
        return MaterialApp(
        	title: "My Application",
            home: Scaffold(
            	appBar: AppBar(title: Text("My Application")),
                body: Material(
                	color: Colors.blue,
                    child: Center(
                    	child: Text(
                        	"Hello World",
                            textDirection: TextDirection.ltr,
                            style: TextStyle(
                            	color: Colors.white,
                                fontWeight: FontWeight.bold,
                                fontStyle: FontStyle.italic,
                                fontSize: 35.0,
                            ),
                        )
                    ),
                )
            )
        );
    }
}
And modify the main method as:
void main(){
  runApp(new MyDesign());
}
You can also rewrite the main method as.
void main()=>runApp(new MyDesign());main.dart
import 'package:flutter/material.dart';

void main()=>runApp( new MyDesign());

class MyDesign extends StatelessWidget{
  @override
  Widget build(BuildContext context) {
    // TODO: implement build
    return MaterialApp(
        title: "My Application",
        home: Scaffold(
            appBar: AppBar(title: Text("My Application")),
            body: Material(
              color: Colors.blue,
              child: Center(
                  child: Text(
                    "Hello World",
                    textDirection: TextDirection.ltr,
                    style: TextStyle(
                      color: Colors.white,
                      fontWeight: FontWeight.bold,
                      fontStyle: FontStyle.italic,
                      fontSize: 35.0,
                    ),
                  )
              ),
            )
        )
    );
  }
}
Run the project and you will see that there are no changes in the application.
Organizing the code – Part 2
Just now, we learned how to organize the code for our single-screen application. But for the applications with more than one screen, it is not possible to place all those code as a separate class in the main.dart file.
For that we’ll write the code for each screens on separate files. Let’s see how.
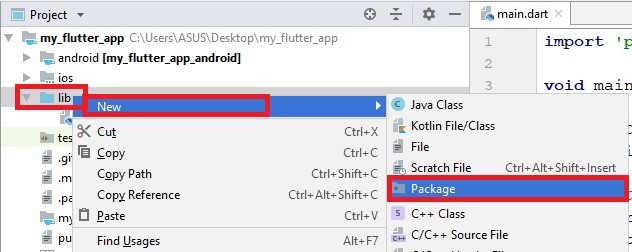
To keep the code for each screens, I’m creating a new package under the lib folder.
To create a new package, Right-click on the lib folder in your project explorer -> New -> Package. Name the package as appscreens.
Right-click on the appscreens package -> New -> Dart File to create a new dart file. Name the file homescreen.dart and add the following contents to it.
import 'package:flutter/material.dart';

class HomeScreen extends StatelessWidget{
  @override
  Widget build(BuildContext context) {
    // TODO: implement build
    return null;
  }

}
Now copy the body contents from main.dart to homescreen.dart.
homescreen.dart
import 'package:flutter/material.dart';
class HomeScreen extends StatelessWidget{
	@override   Widget build(BuildContext context) {
    	// TODO: implement build
        return Material(
        	color: Colors.blue,
            child: Center(
            	child: Text(
                	"Hello World",
                    textDirection: TextDirection.ltr,
                    style: TextStyle(
                    	color: Colors.white,
                        fontWeight: FontWeight.bold,
                        fontStyle: FontStyle.italic,
                        fontSize: 35.0,
                    ),
                )
            ),
        );
    }
}
To make the changes visible, we have to call homescreen.dart from main.dart. For that, add a reference to homescreen.dart.
import 'appscreens/homescreen.dart';And modify the code as:
import 'package:flutter/material.dart';
import 'appscreens/homescreen.dart';

void main()=>runApp( new MyDesign());

class MyDesign extends StatelessWidget{
  @override
  Widget build(BuildContext context) {
    // TODO: implement build
    return MaterialApp(
        title: "My Application",
        home: Scaffold(
            appBar: AppBar(title: Text("My Application")),
            body: HomeScreen(),
        )
    );
  }
}
Run the project and you will notice that there are no changes in the appearance of the application.
What we’ve learned
In this post, we’ve learned how to:
- Organize the code.
- Add separate code for different screens.


