

I am a huge fan of Microsoft stuff. I like Windows, ASP .NET and C#. The only thing that worried me is that ASP .NET applications run only on Windows platform. But with the release of ASP .NET Core, things have changed. We can now deploy ASP .NET Core apps on any platform. This post demonstrates how to host ASP .NET Core application on a Linux server.
Prerequisites
Please keep in mind that an ASP .NET Core app cannot be deployed to the server just like how we deploy a PHP application on shared hosting.
You need to perform some Linux specific stuff to host our ASP .NET Core application. So I assume that you have a basic knowledge of Linux commands how to manage a VPS hosting or connect to the server using SSH.
If you are still using shared hosting, it’s the right time to move to a VPS hosting. If you are new to VPS hosting, try Vultr. It super-simple, feature-rich and beginner-friendly.
Update: Sign-up using this link and get $50 free credit to test the platform.

An interesting fact
To run PHP or Java applications on your server, you need to install them first. Well, that might be difficult for non-Linux users. But should you do the same for ASP .NET Core? The answer might surprise you.
There are two ways to deploy an ASP .NET Core application.
- Framework dependent.
- Self contained.
A Framework-dependent application requires .NET Core to be installed on the host machine. When deploying multiple applications, you can save a lot of space as a Framework-dependent application will have only the application-specific files because the core files are already installed.
Unlike Framework dependent deployment, a Self-contained deployment does not require the .NET Core libraries to be installed on the system. As the name indicates, your application will contain all the files and libraries required to run on any server.
The first step: Publishing your application.
Before deploying your application to a real server, your application should be published targeting the host platform. Also, make sure that the environment is set to Production.
Let me show you everything from the beginning.
First, create an ASP .NET Core application as I explained in this post. For this example, I’ve created a new project named ASPCore.
Next, create a publishing profile for your application (If you have not done this before) by clicking on Build -> Publish <Project Name> ->New Profile. You will get a window as shown below.
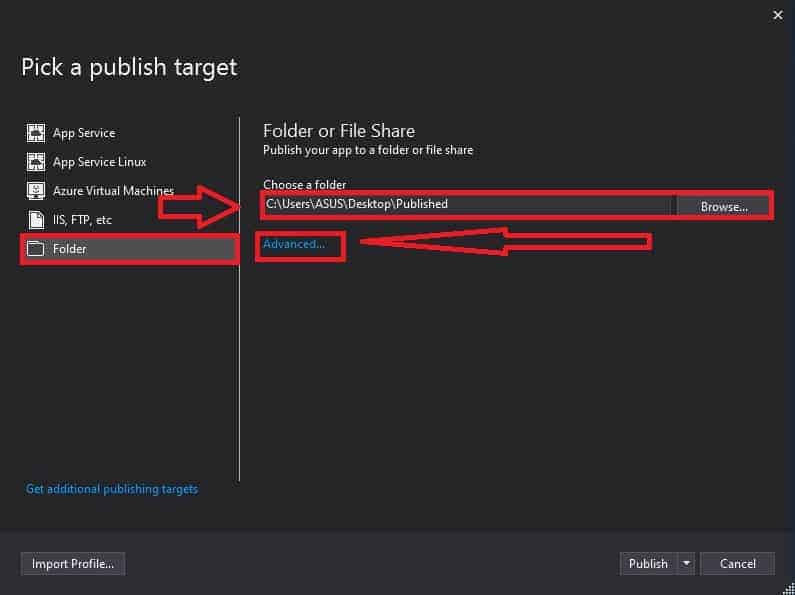
Select Folder from the left side and click Browse to pick a location to save the output. I have selected to save the output to a folder named Published in Desktop. So my location will be C:\Users\ASUS\Desktop\Published.
Now Click on advanced to select the publish configuration of your application.
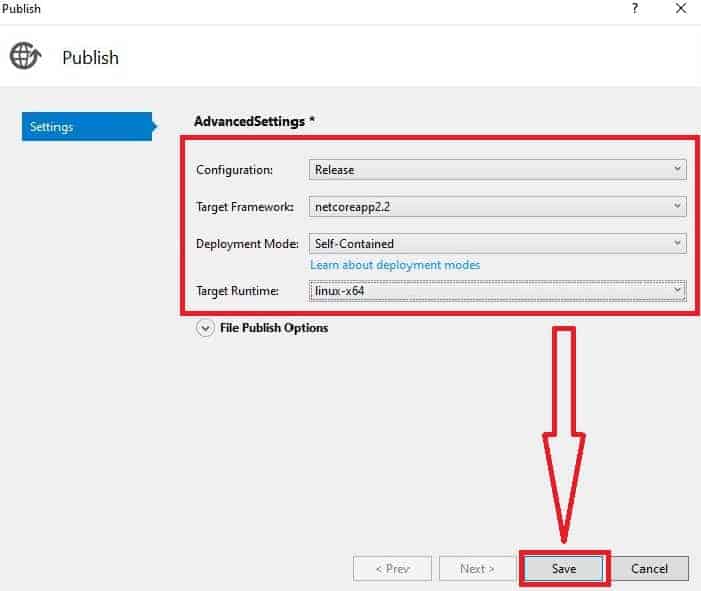
Click Save and then click Publish. Wait for a few seconds to complete publishing your project. If you open the Publish-location, you will see a couple of files and folders there. That’s what we need. Copy them to your server and place it under var/www/mysite. using Filezilla or SCP.
Copying files using FileZilla
To copy files using FileZilla, open FileZilla client and click on File -> Site Manager. In the window that appears, click New Site. Fill the fields that appear at the right side of the window as follows.
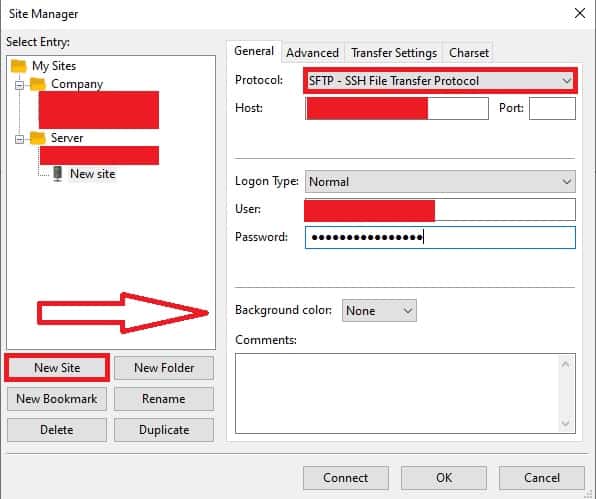
- Protocol: SFTP.
- Host: IP of the server.
- Logon Type: Normal.
- User: Server username.
- Password: Server password.
Click Connect to finish. In the next window, navigate to ../var/etc. Create a directory named mysite.

Navigate to mysite folder and drag-and-drop the contents of your publish folder to it.
Copying files using SCP
Open cmd or PowerShell and type the following command.
scp -r C:/Users/ASUS/Desktop/Published/* user@ip:/var/www/mysite- Replace C:/Users/ASUS/Desktop/Published/* with the path to your publish folder.
- Replace user with the username you use to connect to the server. Most probably, it will be root.
- Replace ip with with the ip address of your server.
Now you will get:
PS C:\Users\***> scp -r C:/Users/ASUS/Desktop/Published/* ***@***.***.***.***:/var/www/mysite
The authenticity of host '***.***.***.*** (***.***.***.***)' can't be established.
ECDSA key fingerprint is SHA***:******************************************.
Are you sure you want to continue connecting (yes/no)?
Type yes. (What you type will be hidden in the console).
Warning: Permanently added '***.***.***.***' (ECDSA) to the list of known hosts.
root@***.***.***.***'s password:
Type the password (I will be hidden from the console) of your server and hit Enter.
If you get scp: /var/www/mysite: No such file or directory message, connect to your VPS or Dedicated server using SSH and create a folder named mysite under var/www and try again.
cd ../var/www
mkdir mysite
After copying the file navigate to mysite directory (cd mysite) and run the following commands.
sudo chmod +x ASPCoreNote: Replace ASPCorewith your project name.
now run the application by running ./ASPCore (Replace ASPCore with your project name)
Set up a reverse proxy server
Although Kestrel is a good web server, Microsoft suggests not to expose it directly. So, I’ll be using Nginx as the proxy server of our application.
Kestrel is great for serving dynamic content from ASP.NET Core. However, the web serving capabilities aren’t as feature rich as servers such as IIS, Apache, or Nginx. A reverse proxy server can offload work such as serving static content, caching requests, compressing requests, and HTTPS termination from the HTTP server. A reverse proxy server may reside on a dedicated machine or may be deployed alongside an HTTP server.From docs.microsoft.com
To install Nginx, connect to the server using SSH and run the following commands.
sudo apt-get install nginxNginx will be installed with default configurations. To configure Nginx to forward requests to our application, we need to make some small changes to the configuration of Nginx. To edit the configuration file, run the following command.
sudo nano /etc/nginx/sites-available/default Clear all the contents and place the following code.
server {
    listen 80;
    location / {
      proxy_pass http://localhost:5000;
      proxy_http_version 1.1;
      proxy_set_header Upgrade $http_upgrade;
      proxy_set_header Connection keep-alive;
      proxy_set_header Host $host;
      proxy_cache_bypass $http_upgrade;
    }
}
Test the configuration with
sudo nginx -t If no errors were displayed, reload the configuration.
sudo nginx -s reload Or restart the server.
sudo nginx -s reload Registering the app as a service
If your application needs to survive a server restart or crash, it should be registered as a service. For that, we’ll be using systemd in Ubuntu (a small utility that watches your application and keeps it running) to do the work.
If you want systemd to monitor your application, a service definition that describes your application should be set up first. You can use the commands given below to create a service definition file.
cd etc/systemd/system
touch aspcore.service
nano aspcore.service
And add the following code to it.
[Unit]
Description= My Application

[Service]
WorkingDirectory=/var/www/mysite/ASPCore
Restart=always
RestartSec=10 # Restart service after 10 seconds if it crashes
SyslogIdentifier=dotnet-core-app
User=user
Environment=ASPNETCORE_ENVIRONMENT=Production

[Install]
WantedBy=multi-user.target
Replace ASPCore with your application name.
Now, enable the service:
sudo systemctl enable aspcore.serviceAnd start the service.
sudo systemctl start aspcore.serviceYou can get the status of your application by running:
sudo systemctl status aspcore.service
You will get a message like this
● jarvis.service - My Application
    Loaded: loaded (/etc/systemd/system/aspcore.service; enabled; vendor preset: enabled)
    Active: active (running) since Wed 2019-06-12 03:10:10 UTC; 23s ago
  Main PID: 621 (ASPCore)
     Tasks: 14 (limit: 1109)
    CGroup: /system.slice/aspcore.service
            └─621 /var/www/mysite/ASPCore
Open any browser and navigate to the URL of your server. You should see your site running.


